Extended faked fog
I was trying some different fog-like effects for our "Hydrogen" intro. And finally I made an interesting code. After that (!) I found an article in Hugi#22 called "Faked fog" by StyX. I recommend you to look at his article first. He explained how to make a good-looking fog. His formulas seemed to be pretty like mine, but with some (important) differences. And I also think he made some mistakes (maybe while typing the article) connected to perspective z-buffer workaround. I will try to explain it.
Here we go: Some theory
The main principle is, as StyX said, not to dim polygons but to dim pixels drawn on screen. This is done using their height data contained in z-buffer. But, z-buffer doesn't actually need to be perspective correct, although if it is the fog can look better.
A perspective z-buffer (called w-buffer, w for Greek omega) is a height buffer, where you store w=1/z values instead of z. It's called perspective-correct because you get absolutely correct results linearly interpolating 1/z about your polygons. From now on I will use terms "z-buffer" and "w-buffer" to point to one of them, and a term "height buffer" to point to both.
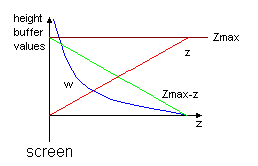
This picture shows how the values in height buffer (z- or w-buffer) change according to z coordinate (usually distance from screen surface). When you dim your scene you look at height buffer, get a fog value and dim the pixel. When you use z-buffer your fog value is Zmax-z. In case of w-buffer your fog value is w itself. Fog value here is the amount of real pixel color (pixel visibility). So, the further is a pixel - the more it's dimmed. A fog, made using a w-buffer, looks a bit more real because the fog value does not depend on the distance linearly.
The fake fog algorithm is as
follows:
camera_clear(fog_color_rgb);
render();
for (each pixel){
  height=height_buffer[pixel_pos];
  if (height < Zclip){   //z-clipping
    fog_value=f(height); //get fog value
    color=fog(screen[pixel_pos]); //calculate dimmed color
    screen[pixel_pos]=color;
  }
}
Depending on the height, the buffer type height value will be z or w, and comparison and f(height) will be different.
Height comparison (z-clipping)
For z-buffer:
  z=z_buffer[x][y];
  if (z < Zclip){
    <do stuff>
  }
For w-buffer:
  w=w_buffer[x][y];
  if (w > 1/Zclip){
    <do stuff>
  }
Getting fog value
For z-buffer:
fog=(Zmax-z)/divider;
For w-buffer:
fog=w/divider;
The divider value controls how fast the fog dims. It's closely connected to your height buffer number format and coordinate system. For example I used a (16.16)fixed coordinate system and (1.31)fixed w-buffer. The normal value seemed to be 512 (of course, I mean I shifted the value right by 9). Try experimenting - the larger the divider is, the faster it dims.
To avoid overflows use this:
if (fog>255) fog=255;
The white fog itself
StyX's formula is (C pseudo code):
color=(255-fog)+(fog*screen[x][y]>>8),
where:
color - resulting pixel color,
fog - fog value of a pixel (got from height-buffer),
screen[x][y] - color of a pixel that's already on screen.
This is per color component. He gets a nice white fog. Now let's make some modifications.
Gray fog
//-----fogx=intensity of fog;
n=fog;
if (n>fogx) n=fogx;
color=(fogx-n)+(fog*screen[x][y]>>8);
And so we got a gray fog (of intensity fogx).
Coloring fog (method 1 - fast, but
rude)
n=fog;
if (n>fogx) n=fogx;
color.r=(fogx-n)+(fog*screen.r[x][y]>>8);
color.g=(fogx-n)+(fog*screen.g[x][y]>>8);
color.b=screen.b[x][y]
As you can see, we just do not dim one color component - a blue one. The fog color is the sum of the dimmed components' colors - here it's yellow (red + green = yellow). The method is fast, because it doesn't require additional calculations (it even removes some). The disadvantage is that you cannot define your fog color as any color. Instead you will have a fog, colored by some fogx values (one for each dimmed color component). Here for example fog.rgb = (fogx, fogx, 0).
Coloring fog (method 2 - good, but not as
fast)
//----
//fogx_r, fogx_g, fogx_b - fog color values
//fogx_r>=fogx_g>=fogx_b

n=fog;
if (n>fogx_r) n=fogx_r;
color.r=(fogx_r-n)+(fog*screen.r[x][y]>>8);
n-=(fogx_r-fogx_g);
color.g=(fogx_g-n)+(fog*screen.g[x][y]>>8);
n-=(fogx_g-fogx_b);
color.b=(fogx_b-n)+(fog*screen.b[x][y]>>8);
Here you can define the fog's color as any color with
fogx_r,fogx_g,fogx_b. Although there must be fogx_r >= fogx_g >= fogx_b. But you can easily
swap the places of the components' calculation. And if not, just
write:
n=fog;
if (n>fogx_r) n=fogx_r;
color.r=(fogx_r-n)+(fog*screen.r[x][y]>>8);
n=fog;
if (n>fogx_g) n=fogx_g;
color.g=(fogx_g-n)+(fog*screen.g[x][y]>>8);
n=fog;
if (n>fogx_b) n=fogx_b;
color.b=(fogx_b-n)+(fog*screen.b[x][y]>>8);
Fog that changes intensity
StyX calls it "adjusting". This is as simple as
this:
  <get fog value>
  fog=(fog*fog_intensity)>>8; //fog_intensity is 0..255
  <dimming pixel as usual>
Fog optimization
This fake fog is of course not a good idea without optimization. The
first thing we should do is precalculating a fog
table:
long FogTable[65536];
for (int fog=0;fog<256;fog++)
  for (int c=0;c<256;c++){
    unsigned char n=fog;
    if (n>fogx) n=fogx;
    FogTable[(fog<<8)|c]=((fogx-n)+(fog*c>>8))<<16;
  }
Ok, you'll see how to use it and why it's "long" and what <<16 is used
for:
__asm{
  mov   eax,fog
  mov   ebx,eax
  mov   edx,eax
  mov   ah,screen_color.r //colors of screen[x][y] pixel
  mov   bh,screen_color.g
  mov   dh,screen_color.b
  mov   eax,[FogTable+eax*4]  //get red
  mov   ah,[FogTable+ebx*4+2] //get green
  mov   al,[Fogtable+edx*4+2] //get blue

  //eax - resulting pixel color
}
See, no arithmetics, only movs. And the table is often cached, so movs are fast. Values in the table are shifted left by 16 (to match the red color). So here no shift is required. You can mix some instructions to improve pairing and so on.
If you need a fog that changes color (aaaaaargh, what for???) or just to have differently colored fogs in different scenes you will need to create more similar tables with changed fogx value. And certainly to have colored by method 2 fog you will need to split this table into 3 (one for each color component).
Clouds of fog / dirt drips on camera (looks cooool!!!!)
First, create a texture of your clouds. Sub-plasma fits great. The pixel
color values of the texture should not be too large. But the larger they
are - the more it looks like dirty drips rather then clouds. Then you just
do:
  <get fog value>
  fog+=plasma[x][y];
  <dimming pixel as usual>
And that's all!!! Of course you can create a color texture or animate it (for example to make a smoking ground). And don't forget that if you want dirty drips you should disable z-clipping.
Ah, it felt so good
These fogs ran smoothly in 640x480 on my ...errr... AMD Duron 850MHZ. ;) I just have no other machine right now and right here to test it. Or no, wait! It gave about 9fps in 320x240 on my friend's ip166MMX.
If you have any comments - mail me. The best messages would be like "hey, you're wrong! Here you should do like this..." Anyway, I'll be interested in any feedback!
13feb2002, Makeevka, Ukraine